Saturday, February 23, 2013

Funny Guys play card

Resource: Vanda Kong

AGENDA – BarCamp Angkor 2013


DAY 1 – 23rd February 2013
8:00 am – 8:30 am ៖ បុគ្គលិក សាស្ត្រាចារ្យ សិស្ស និស្សិត អ្នកចូលរួម និងភ្ញៀវកិត្តិយសជួបជុំគ្នា
8:30 am – 8:50 am ៖ គណៈអធិបតីអញ្ជើញមកដល់
8:50 am – 8:55 am ៖ ប្រកាសហេតុ
8:55 am – 9:00 am ៖ គោរពភ្លេងជាតិ
9:00 am – 9:10 am ៖ ការឡើងថ្លែងរបាយការណ៍អំពី Barcamp Angkor ដោយលោក បេ ចន្ត្រា ប្រធានគណៈកម្មការរៀបចំកម្មវិធី Barcamp Angkor 2013
9:10 am – 9:20 am ៖ ចំណាប់អារម្មណ៍របស់កញ្ញា ជួប ម៉ូលី ប្រធានផ្នែកផ្សព្វផ្សាយនិងទំនាក់ទំនង, CellCard
9:20 am – 9:30 am ៖ ចំណាប់អារម្មណ៍លោក ប៊ូ វិជិត ប្រធានសាខាក្រុមហ៊ុន Online ខេត្តសៀមរាប
9:30 am – 9:40 am ៖ ចំណាប់អារម្មណ៍របស់កញ្ញា ហេង ចាន់ថេង ប្រធានគម្រោងកម្មវិធី SPICE ឧបត្ថម្ភដោយ USAID
9:40 am – 9:55 am ៖ សុន្ទរកថា របស់លោក សៀន សុវណ្ណា សាកលវិទ្យាធិការនៃសាកលវិទ្យាល័យសៅស៍អ៊ីសថ៍​អេយសៀ
9:55 am – 10:10 am ៖ សុន្ទរកថា និងប្រកាសបើកកម្មវិធីពិព័រណ៍ Barcamp Angkor 2013 របស់ឯកឧត្ដម ម៉ៅ វុឌ្ឍី ទីប្រឹក្សាសម្តេចអគ្គមហាពញាចក្រីកិត្តិព្រឹទ្ធបណ្ឌិត ហេង សំរិន ប្រធានរដ្ឋសភា និងជាអភិបាលរងនៃគណៈអភិបាលខេត្តសៀមរាប
10:10 am – 10:15 am ៖ ថតរូបអនុស្សាវរីយ៍
10:15 am – 10:30 am ៖ ប្រកាស និងការ​បិត​ប្រធានបទ នៅ​លើ​តារាង​ប្រធាន​បទ (Topic Posting)
10:30 am – 11:15 am ៖ 1st Session
11:15 am – 12:15 pm ៖ 2nd Session
12:15 pm – 1:15 pm ៖ Lunch Time
1:00 pm – 1:55 pm ៖ កម្មវិធី​កម្សាន្ត
2:00 pm – 3:00 pm ៖ 3rd Session
3:00 pm – 4:00 pm ៖ 4th Session
4:00 pm – 5:00 pm ៖ 5th Session
5:00 pm – 5:30 pm ៖ កម្មវិធី​កម្សាន្ត
DAY 2 – 24th February 2013
8:00 am – 8:30 am : Registration
8:30 am – 9:00 am : កម្មវិធី​កម្សាន្ត
9:00 am – 10:00 am : 6th Session
10:00 am – 11:00 am : 7th Session
11:00 am – 12:00 am : 8th Session
12:00 pm – 1:15 pm : Lunch Time
1:15pm – 1:55pm : កម្មវិធី​កម្សាន្ត
2:00 pm – 3:00 pm : 9th Session
3:00 pm – 4:00 pm : 10th Session
4:00 pm – 5:00 pm : 11th Session
5:00 pm – 5:30 pm : បិទកម្មវិធី និងថតរូបអនុស្សាវរីយ៍

How to focus


I am programmer I think some special

95% of people say they struggle to focus.  How to Focus:
  1. Keep food at your desk:  glucose helps your brain focus.
  2. Turn off the phone:  most phone calls are not urgent.
  3. Get a good chair: there is a reason bosses don’t sit in cheap chairs.
  4. Time yourself:  and see how much you didn't 1 hour.
  5. Shut off everything:  that you are not really using.
  6. Clear your desk:  clear everything completely.
  7. Put on headphone: classical music or no music is best for focusing.
  8. Make a list: write your list and make it short.
  9. Reward yourself:  if you get focused, be proud of yourself.
  10. Frame a picture of your goal: look at it every morning before work.
  11. Bring your pet with you: they help you focus.

Try your best for your focus on thing everywhere, every time what you think to make it no more struggles to focus. Enjoy doing it together and success.


Friday, February 22, 2013

Using Google Public DNS


Google Public DNS

Configuring your network settings to use Google Public DNS

When you use Google Public DNS, you are changing your DNS "switchboard" operator from your ISP to Google Public DNS.
In most cases, the IP addresses used by your ISP's domain name servers are automatically set by your ISP via the Dynamic Host Configuration Protocol (DHCP). To use Google Public DNS, you need to explicitly change the DNS settings in your operating system or device to use the Google Public DNS IP addresses. The procedure for changing your DNS settings varies according to operating system and version (Windows, Mac or Linux) or the device (computer, phone, or router). We give general procedures here that might not apply for your OS or device; please consult your vendor documentation for authoritative information.
Note: We recommend that only users who are proficient with configuring operating system settings make these changes.

Important: Before you start

Before you change your DNS settings to use Google Public DNS, be sure to write down the current server addresses or settings on a piece of paper. It is very important that you keep these numbers for backup purposes, in case you need to revert to them at any time.
After changing your settings, if you encounter a problem and cannot connect to the Internet, please call our support numbers for troubleshooting instructions.
We also recommend that you download this page and print it, in the event that you encounter a problem and need to refer to these instructions.

Google Public DNS telephone support

  • 877-590-4367 in the U.S.
  • 770-200-1201 outside the U.S.

Google Public DNS IP addresses

The Google Public DNS IP addresses (IPv4) are as follows:
  • 8.8.8.8
  • 8.8.4.4
The Google Public DNS IPv6 addresses are as follows:
  • 2001:4860:4860::8888
  • 2001:4860:4860::8844
You can use either number as your primary or secondary DNS server. You can specify both numbers, but do not specify one number as both primary and secondary.
You can configure Google Public DNS addresses for either IPv4 or IPv6 connections, or both.

Changing your DNS servers settings

Because the instructions differ between different versions/releases of each operating system, we only give one version as an example. If you need specific instructions for your operating system/version, please consult your vendor's documentation. You may also find answers on our user group.
Many systems allow you to specify multiple DNS servers, to be contacted in a priority order. In the following instructions, we provide steps to specify only the Google Public DNS servers as the primary and secondary servers, to ensure that your setup will correctly use Google Public DNS in all cases.
Note: Depending on your network setup, you may need administrator/root privileges to change these settings.

Microsoft Windows

DNS settings are specified in the TCP/IP Properties window for the selected network connection.
Example: Changing DNS server settings on Microsoft Windows 7
  1. Go the Control Panel.
  2. Click Network and Internet, then Network and Sharing Center, and click Change adapter settings.
  3. Select the connection for which you want to configure Google Public DNS. For example:
    • To change the settings for an Ethernet connection, right-click Local Area Connection, and click Properties.
    • To change the settings for a wireless connection, right-click Wireless Network Connection, and click Properties.
    If you are prompted for an administrator password or confirmation, type the password or provide confirmation.
  4. Select the Networking tab. Under This connection uses the following items, select Internet Protocol Version 4 (TCP/IPv4) or Internet Protocol Version 6 (TCP/IPv6) and then click Properties.
  5. Click Advanced and select the DNS tab. If there are any DNS server IP addresses listed there, write them down for future reference, and remove them from this window.
  6. Click OK.
  7. Select Use the following DNS server addresses. If there are any IP addresses listed in the Preferred DNS server or Alternate DNS server, write them down for future reference.
  8. Replace those addresses with the IP addresses of the Google DNS servers:
    • For IPv4: 8.8.8.8 and/or 8.8.4.4.
    • For IPv6: 2001:4860:4860::8888 and/or 2001:4860:4860::8844
  9. Restart the connection you selected in step 3.
  10. Test that your setup is working correctly; see Testing your new settings below.
  11. Repeat the procedure for additional network connections you want to change.
Resource: google

About the Blogger "Earnings" tab


The Earnings tab in Blogger makes it easy to enable AdSense ads on your blog. Once your account has been approved, Blogger retrieves your earnings data so you don't need to visit the AdSense dashboard to access basic earnings information.
Blogger Earnings tab for new interfaceAdSense Report
Once you start generating AdSense impressions, you'll begin earning money when people click on ads that appear on your blog. The earnings report (visible when you click the Earnings tab) includes a drop-down bar with TodayYesterdayLast 7 DaysThis Month, and All time.
Selecting an option will retrieve the relevant report directly from AdSense.
All time
If you're an existing AdSense user, you'll notice that Blogger created a new channel (with the URL of your blog) in your account. If you have had AdSense ads on your blog before using Blogger’s AdSense integration to insert ads into your blog, note that All time will retrieve data only from the time you connected Blogger to your AdSense account.
This does not affect your overall AdSense reporting, available directly from AdSense.
Terminology
The AdSense report visible from the Earnings tab contains basic information about how many ads have run on your blog, how many clicks were generated, and how much revenue you've earned. Each term in the report is defined below:
  • Page views: A page view is generated every time a user views a page displaying Google ads. We'll count one page view regardless of the number of ads displayed on that page. For example, if you have a page displaying three ad units and it's viewed twice, you'll generate two page views and six ad unit impressions.
  • Clicks: The number of times the ads were clicked on in the given reporting period.
  • Page CTR (Click-through rate): The number of ad clicks divided by the number of page views.
  • CPC (Cost per click): The average amount paid by the advertisers for each ad click.
  • Page RPM (Revenue per mille): This is revenue per 1,000 page views. RPM = (Page views x CTR x CPC) / 1,000
For more information please check out the AdSense Help Center.
Resource: google

Thursday, February 21, 2013

Android Review


1/ Create android app:
   - On eclipse go to File->New->Android Application project
   - Fill Application name "HelloWorld", Project Name, and Package Name then choose Build SDK version ->Next in order to Finish.

2/ To configure android on eclipse:
   - On eclipse go to Help ->Install New Software
   - Add new repository and android web site->Install 
   - After finish installation go to Window->Preferences->Android then browse to android sdk path
   - Click on icon AVD (Android Virtual Device) Manager -> Add new Device
   - Fill Name, Target, and Size-> Create AVD

3/ To use services on android:
  - open file AndroidManifest.xml
  - Click on Permission tab->Add ->Uses permission
 - Choose service name->Save.

or we can type:
 e.g: to use Internet
<use-permission android:name="android.permission.INTERNET" />

4/ Input data and retrieve with putExtras
 - input value 
      Intent in;
      in = new Intent(this, Activity2.class);
      in.putExtra("name", "bunthan"); 
      in.putExtra("age", "23");
      startActivity(in);


- to retrieve data in Activity2.java
 
        Bundle extras = getIntent().getExtras();
        if(extras == null) {
            return;
        }
        String name = extras.getString("name");
        int age = extras.getInt("age");


5/ use click
     ->android:onClick
     -in the xml file add android:onClick="showMe"
     -in the java file type 
     public void showMe(View v) {
          Toast.makeText(this, "This event clicked from XML.", Toast.LENGTH_SHORT).show();
     }      

   
   -> Anonymous class
     Button btnHelp = (Button) findViewById(R.id.btn_help);
     btnHelp.setOnClickListener(new OnClickListener() {
            public void onClick(View v) {
                Intent i = new Intent(Activity1.this, Activity2.class);  
                startActivity(i);
            }
        });     


6/ Database
    declare global variable: 
  private SQLiteDatabase db; 
  private String db_name = "person";


    -> Create database or open if exists
    private void openDatabase(String dbname){
        db = openOrCreateDatabase(dbname, MODE_PRIVATE, null);
        db.execSQL("CREATE TABLE IF NOT EXISTS tbl_person(name VARCHAR, phone VARCHAR, email VARCHAR);");
    }


   ->Close Database
    private void closeDatabase(){
        db.close();
    }


 ->Insert new record
     private void insert(String name, String phone, String email){
        db.execSQL("INSERT INTO tbl_person VALUES('" + name + "', '" + phone + "', '" + email + "');");
    }

    
->Delete record
    private void delete(String name){
        db.execSQL("DELETE FROM tbl_person WHERE name='" + name + "';");
    }
  

->Update record  
    private void update(String name){
        db.execSQL("UPDATE tbl_person SET name='" + name + "';");
    }


-> retrieve all data containing name with String Search
   private void select(String search) {
        Cursor result = db.rawQuery("SELECT * FROM tbl_person WHERE name LIKE '%" + search + "%'", null);
        result.moveToFirst();
        
        while(!result.isAfterLast()){
            String name = result.getString(0);
            String phone = result.getString(1);
            String email = result.getString(2);
            
            //do something here
            TextView tv = new TextView(this);
            tv.setText("name: "+ name + ", phone: " + phone + ", E-mail: " + email);
            
            LinearLayout linlay = (LinearLayout)findViewById(R.id.LinearLayout1);
            linlay.addView(tv);
            //end of do            
            result.moveToNext();
        }
    }


Author: Bunthan Prak

Wednesday, February 20, 2013

Experimental photo collage using CSS3

This is an experimental photo collage. Shipon made this for his personal website but decided not to use a single photo instead. Instead of letting the code go to waste, he thought of sharing it. Enjoy!

Please do note the photo credit in the CSS file.
Reference: http://cssdeck.com/labs/collage

Friday, February 15, 2013

The eight key components of an effective business model

                              
                                                                                      businessmodelsinc

You will wonder what business model is. Business Model is a set of planed activities designed to result in a profit in a market place. In short, how to make money in business more effectively. I just review about business plan is a document that describe a firm's business model. So you know how it has connection each other between business plan and business model.

If you want to make more money for your business, you should have effective business model for your company. The eight key components of business model are:
  1. Value Proposition
  2. Revenue Model
  3. Market Opportunity
  4. Market Strategy
  5. Competitive Environment
  6. Competitive Advantage
  7. Organization Development
  8. Management Team
You should create your activities to reach your goal in your business to be an effective business model. So your business will increase more profit. Enjoy your own business model or you can do like what I listed above.

Related article: The True Definition of Income

The unique features of E-commerce

                                                                           writerlisamason

If you want to run your business online. you should know of what the features of E-commerce have for you.

The unique features of E-commerce is listed below:
1. Ubiquity: Internet/web technology conducts your business 24*7*365 which available everywhere: at work, at home, and elsewhere via mobile devices, any time.
2. Global Reach: The technology reaches your business accross the national bouderies around in the world
3. Universal Standard: There is one set technology standard, namely internet standard.
4. Richness: Video, audio and text message are posible.
5. Interactivity: The technology works through interaction with user.
6. Information density: The technology reduces cost and raise quality.
7. Personalization and customization: The technology allows personalized messages to be delivered to individuals as well as groups.

All above are the features of E-commerce that make you decide to create business online.

Thursday, February 7, 2013

Motion in Air for Photo : http://www.behance.net/gallery/MOTION-IN-AIR-2/6772235

Sunday, February 3, 2013

Before and After (Peel Back) Image

Before and After (Peel Back) Image
Author: Dynamic Drive
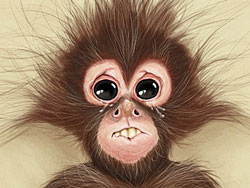
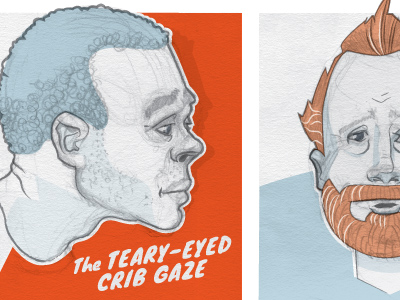
"Before and After" images are always fun to look at, especially if the right transition is used to effectively swap between the two. This CSS example shows just that, using CSS3 animation to animate the "clip" property of the "before" image to peel back and reveal the "after" image onMouseover. The result is a simple but sleek "Before and After" Image effect!


CSS


<style type="text/css">

a.nowandthen{
position:relative;
display: block;
overflow:hidden;
cursor: pointer;
width: 650px; /* set width of image container */
height: 434px; /* set height of image container */
}

a.nowandthen img{
position:absolute;
left:0;
top:0;
width: 100%;
height: 100%;
-moz-transition: all 0.5s ease; /* enable transition */
-webkit-transition: all 0.5s ease;
-o-transition: all 0.5s ease;
-ms-transition: all 0.5s ease;
transition: all 0.5s ease;
z-index: 2;
clip: rect(0,650px,434px,0); /* clip values should be rect(0,image_width,image_height,0) */
}


a.nowandthen img:nth-of-type(2){ /* hide "after" image beneath "before" so it's initially out of view */
z-index: 1;
}


a.nowandthen:hover img:nth-of-type(1){ /* clip "before" image to reveal "after" */
clip: rect(0,0,434px,0); /* clip values should be rect(0,0,image_height,0) */
opacity: 0;
}

a.nowandthen.alt{
width: 300px; /* set width of image container */
height: 354px; /* set height of image container */
}

a.nowandthen.alt img{
clip: rect(0,300px,354px,0); /* clip values should be rect(0,image_width,image_height,0) */
}

a.nowandthen.alt:hover img:nth-of-type(1){
clip: rect(0,0,354px,0); /* clip values should be rect(0,0,image_height,0) */
}

</style>

HTML

<a class="nowandthen">
<img src="http://img526.imageshack.us/img526/8063/beforejt.jpg" alt="">
<img src="http://img52.imageshack.us/img52/75/afteruc.jpg" alt="">
</a>

<a class="nowandthen alt">
<img src="http://img23.imageshack.us/img23/3189/before2f.jpg" alt="">
<img src="http://img824.imageshack.us/img824/2466/after2g.jpg" alt="">
</a>

Resources: http://www.dynamicdrive.com/style/csslibrary/item/before_and_after_peel_back_image/


Saturday, February 2, 2013

ASP.NET Features


§Server Controls
§ASP.NET provides several server controls that simplify the task of creating pages
§They automatically maintain their selection states and expose properties, methods, and events for server-side code
§Web Services
§A Web service is an application delivered as a service that can be integrated with other Web services by using Internet standards.
§Improved Security
§In ASP, the only type of authentication that you can use is the Windows authentication, whereas ASP.NET allows different types of logon and user authentication: Windows, Passport, and Cookies.

§Multiple Language Support
§Microsoft has compilers for Visual Basic, Microsoft Visual C#™ , Microsoft Visual C++®,…etc.
§Increased Performance
§In ASP.NET, code is compiled. When you request a page for the first time, the run time compiles the code and the page itself, and keeps a cached copy of the compiled result.
§Classes and Namespaces
§ASP.NET includes a range of useful classes and namespaces. Namespaces are used as an organizational system— a way to present program components that are exposed to other programs and applications. Namespaces contains classes.